You are using an out of date browser. It may not display this or other websites correctly.
You should upgrade or use an alternative browser.
You should upgrade or use an alternative browser.
Logic pro x: stems
- Thread starter Tobias A. Ratka
- Start date
Ashermusic
Senior Member
Good thinking, I'll give it a try. Why are your sends not set to 0dB?
I wasn't paying attention to anything other than illustrating the principle.
Ashermusic
Senior Member
I'm wondering if dynamic processing behaves the same when sent to an aux track. I'll be sure to test this. Thanks
You are welcome.
Ashermusic
Senior Member
No dice, you can't send your mix processing to the return bus and print it. You can't have multiple audio streams be processed independently and simultaneously by a single plug-in. I had to experiment to find out...
Sonofagun, you are right. When I arm the tracks I hear the processing on each track, but when I record it's only on one.
Back to the drawing board.
Ashermusic
Senior Member
Nope, I was wrong, it doesn't work. Sorry, I really thought I had found the solution.
Last edited:
ThomasJ.Curran
Member
I'm gonna re ignite this thread as I too am scratching my head. Libraries I write for usually want a stem for every instrument, so on large orchestral tracks printing every stem individually takes forever. I have tried the method of recording from the bus channels directly to audio tracks in realtime but it doesn't include any of my reverb sends. I have heard some people print an individual reverb stem for every instrument but that would be a massive pain in the arse, I want the reverb baked into each stem.
Did anyone find a work around for this at all? I'm fairly new to logic so forgive my ignorance.
Did anyone find a work around for this at all? I'm fairly new to logic so forgive my ignorance.
Saxer
Senior Member
If the output of the reverb is routed to the same aux channel as your stem instruments it should be recorded too. You need a separate reverb instance for each stem aux.
And you have to avoid feedback loops. So you can send all trumpets to a trumpet aux summing channel and a trumpet reverb to the same aux. But you can't use a send from your trumpet summing aux to the reverb. You need to use individual sends from each trumpet instrument channel to the reverb.
And you have to avoid feedback loops. So you can send all trumpets to a trumpet aux summing channel and a trumpet reverb to the same aux. But you can't use a send from your trumpet summing aux to the reverb. You need to use individual sends from each trumpet instrument channel to the reverb.
Saxer
Senior Member
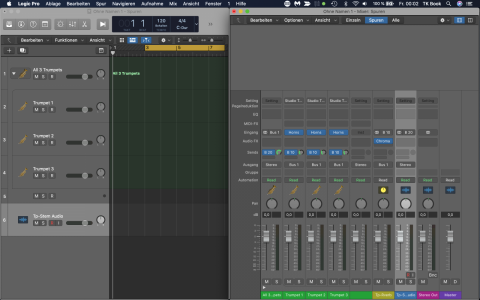
Example with 3 trumpets
The easiest way is to select all trumpets channels and make a summing stack (in the track menu... here in my German version it's "Spur"). Select: Track Stack - Summing Stack. Logic now routs all trumpet tracks to a new Aux and place it on top of your trumpet tracks. You can close or open the stack with that little arrow. The input is Bus 1 in this example (Logic looks for the next unused bus). You can see that all trumpet outs are going to Bus 1.
When you add a reverb for the trumpets make sure the output of the reverb is going to Bus 1 too. I set the reverb input to Bus 10, the trumpets have a bus 10 send where I can dial the reverb level per instrument.
Now all signals from 3 trumpets and the trumpet reverb are going into bus 1 which feeds into the "All 3 Trumpets" Aux channel.
Now add a new audio track. In this example I use bus 20 for the input. In added a send in the "All 3 Trumpets" Aux to bus 20. Now the signal from all the trumpets and the reverb is going to your audio track.

ThomasJ.Curran
Member
Thanks Saxer, I appreciate it. I’ll give this a go tomorrow, hopefully my machine will be able to cope with all the separate reverb instancesExample with 3 trumpets
The easiest way is to select all trumpets channels and make a summing stack (in the track menu... here in my German version it's "Spur"). Select: Track Stack - Summing Stack. Logic now routs all trumpet tracks to a new Aux and place it on top of your trumpet tracks. You can close or open the stack with that little arrow. The input is Bus 1 in this example (Logic looks for the next unused bus). You can see that all trumpet outs are going to Bus 1.
When you add a reverb for the trumpets make sure the output of the reverb is going to Bus 1 too. I set the reverb input to Bus 10, the trumpets have a bus 10 send where I can dial the reverb level per instrument.
Now all signals from 3 trumpets and the trumpet reverb are going into bus 1 which feeds into the "All 3 Trumpets" Aux channel.
Now add a new audio track. In this example I use bus 20 for the input. In added a send in the "All 3 Trumpets" Aux to bus 20. Now the signal from all the trumpets and the reverb is going to your audio track.


I've been trying to figure out the best way for me to export stems in Logic also.Example with 3 trumpets
The easiest way is to select all trumpets channels and make a summing stack (in the track menu... here in my German version it's "Spur"). Select: Track Stack - Summing Stack. Logic now routs all trumpet tracks to a new Aux and place it on top of your trumpet tracks. You can close or open the stack with that little arrow. The input is Bus 1 in this example (Logic looks for the next unused bus). You can see that all trumpet outs are going to Bus 1.
When you add a reverb for the trumpets make sure the output of the reverb is going to Bus 1 too. I set the reverb input to Bus 10, the trumpets have a bus 10 send where I can dial the reverb level per instrument.
Now all signals from 3 trumpets and the trumpet reverb are going into bus 1 which feeds into the "All 3 Trumpets" Aux channel.
Now add a new audio track. In this example I use bus 20 for the input. In added a send in the "All 3 Trumpets" Aux to bus 20. Now the signal from all the trumpets and the reverb is going to your audio track.

Every project I try something new.. but I'm yet to find the perfect one, specially since some projects ask for stems with reverb baked in and others want the reverbs separate.
I've used this technique previously but I'm always confused when I use bus processing (which is often - some 1-2 db compression, saturation and eq). This means that, essentially, I'm applying the bus processing to the dedicated reverb also (because it's routed back into the bus for printing) and I'm yet to figure out if that's something I like or not.
This decision is easier when I'm required to deliver separate reverb stems, this way the summing stacks are printed with the bus processing and the reverb goes separate without any processing.
I'm glad I came across this thread as this technique might prove useful in the future.Here is how I do it:
- Create a Marker exactly where you want the start of all the bounced files to be, and another one exactly where you want those files to end. If timecode is important, go into the Marker List and type in the exact timecode points. Lock the Markers so they won't move.
- Turn Cycle on, and make sure the left and right boundaries of the Cycle range are exactly on those Markers. I have key commands to do this.
- If you have multiple Instruments / Audio Tracks that hit the same effects but need to be separate bounces, in the Main Window select all of the regions that you want in the first bounce pass. You do not need to select Tracks, only the REGIONS that you want in the bounce.
- Turn on Object Solo. Not the solo buttons on the Track Headers, the little "S" in the square box in the Control Bar. I have a key command to do this. Now only the selected Regions will play - it's as though you've muted or deleted everything that wasn't selected before you hit solo. All audio pathways are still open and functional.
- Do the bounce.
- Repeat the process for each set of Regions that are part of each stem.
Your bounced files will be exactly the length of the Cycle, provided you did not enable "Include Audio Tail" in the Bounce dialog. You can also skip the steps involved in setting the Markers and Cycle length if you just want to bounce to a length in bars+beats - you can type in the start and end of your desired Bounce directly in the Bounce dialog, but you'll need to do it every time and you can not type in timecode numbers, only bars+beats, so setting Markers at exact timecode points and using them as the boundaries for the Cycle range ensures that you are bouncing a precise range. The start+end points in the Bounce dialog are initially whatever the Cycle range is, if a Cycle range is set.
This process requires bouncing each stem as a separate pass, but if you've got a bunch of elements sharing an effect or audio path, using Object Solo will ensure that only the desired elements will produce sound, but that all audio pathways, busses, effects, etc. are open and functional.
When I don't feel like booting up my ProTools rig to print stems, or I only need to bounce three stems or whatever, this is the process I use. The resulting bounced files will all be exactly the same length and include only the Regions that were Object Solo'ed. I sometimes use color coding of Regions to indicate which bounce they should be a part of - select a bunch of Regions by shift-clicking until I have the ones I want in the first bounce, then color code them all to the same color, then Object Solo, then Bounce. Un-solo, select the next bunch of Regions (but none of the ones I just bounced), make them a different color, Object Solo, bounce. Repeat.
One great feature about doing it this way is that you can have two Regions on the same Track each be part of a different bounce. Say you have a single VI track that has a cinematic boom and a high drone at two different points in the cue - select the first region and make it part of one bounce, then include the second region in a different bounce.
I've done it this way for 16 years or so. Perfect every time.
This seems like the simplest way to bounce stems when there's not many of them.
I just wish I could get the cmd+e while selecting all summing stacks technique working consistently without sometimes getting random file sizes, this has always been the fastest way to export stems when it works for me.
Share:


