What's new

Spiral score album incoming...

Sounds great! Congrats on the successful release Charlie. The mixing is absolutely stellar, and those low drums make my blood run cold. I love a good horror score, and hopefully one day I can actually watch the film (not playing in Kingston, ON at the moment.)

I'm wondering if you're willing to share a bit about how you made a certain sound; the high-pitched 'clacky' percussion at 0:44s in Boz (the sound with the delay on it.) What the heck is that? It sounds so cool and suspenseful!
 
I'm wondering if you're willing to share a bit about how you made a certain sound; the high-pitched 'clacky' percussion at 0:44s in Boz (the sound with the delay on it.) What the heck is that? It sounds so cool and suspenseful!

That little clack-y thing used to be a tiny snare with a ton of reverb on it, and then I messed with the pitch, bandpass filtered it in Ableton using their stock AutoFilter plugin, and stuck some Logic Tape Delay on it. All of the drums on that cue are a shameless rip-off of JNH's score to Michael Clayton. Lots of stuff pitched down, bandpass or lowpass filtered, and plenty of Logic Tape Delay. The percussion on Michael Clayton is deceptive - it seems like it would take two minutes with a slowed-down hip-hop loop and some filtering, but it always winds up taking me two hours instead of two minutes!
 
I've followed your notes (novels?) on your rig for a while now - but how the HELL do you keep track of what you have at your disposal for sounds at any given moment? I know you're highly organized with every bit and bob you've ever had, but still man, HOW?

I have a tiny little fraction of the samples you've got and I'm starting to forget 'super-cool-shit-I-could-have-used-on-this-track' here and there.

Congrats on the release and continued success with the franchise - horror movies hitting $1 billion? Who'd of thought?!
 
That little clack-y thing used to be a tiny snare with a ton of reverb on it, and then I messed with the pitch, bandpass filtered it in Ableton using their stock AutoFilter plugin, and stuck some Logic Tape Delay on it. All of the drums on that cue are a shameless rip-off of JNH's score to Michael Clayton. Lots of stuff pitched down, bandpass or lowpass filtered, and plenty of Logic Tape Delay. The percussion on Michael Clayton is deceptive - it seems like it would take two minutes with a slowed-down hip-hop loop and some filtering, but it always winds up taking me two hours instead of two minutes!
Awesome, thanks for sharing! Sounds like quite a process, but I think it pays off :)
 
I've followed your notes (novels?) on your rig for a while now - but how the HELL do you keep track of what you have at your disposal for sounds at any given moment? I know you're highly organized with every bit and bob you've ever had, but still man, HOW?
In terms of separating the wheat from the chaff:

- If it's EXS Instruments we're talking about, they've already been culled to the point where everything in there is good, approved for use, and there simply IS no chaff. Plus, with EXS Instruments you can browse through them using the arrow keys and key commands on the Mac keyboard from within Logic - zero mouse movements or clicks required - and they load instantly (or in less than one second) so it's really fast to arrow-key your way to what you want.

- If those EXS Instruments were created by extracting WAVs from un-locked (non-Kontakt-Player) Kontakt libraries, or converting Kontakt v5 or earlier libraries using Chicken Systems Translator, then they've been SEVERELY culled during the export / import / conversion / editing process. My keep rate on extracted / converted Kontakt stuff is less than 5%, probably closer to 2%. So there's not all that much to weed through. It's all wheat, baby!

- If we're talking about Kontakt libraries that were either, A) too complex to convert to EXS in a practical manner, or B) a Kontakt v6 or Player library that can't be converted and won't export its WAVs, then I usually do the following:

1 - Right after purchasing and initial installation, while I'm still psyched to hear what I just bought, I duplicate the Instruments folder, and compress the original to a ZIP archive, so I have a safety of the Instruments, a zipped safety, and my "working copy". These are named "Instruments Original Names", "Instruments Original Names.zip", and "Instruments".

1b - If we're talking about a Kontakt library that uses a single Instrument and a zillion accompanying Snapshots to bring up individual sounds, then all of this talk about Instruments - duplicating, zipping, and renaming - applies to dealing with Snapshots.

2 - I go into the working copy of the Instruments folder, and get busy renaming them to conform to my preferred naming scheme. Then I compress THAT to a ZIP archive so now I have "Instruments Renamed.zip" as well. That's in case I delete something I want to get back, but I want to get back the version with the good names.

3 - Now I can start auditioning and deleting. I go into the working copy of the Instruments (or Snapshots) folder (the one with the good names) and start auditioning and RUTHLESSLY deleting, right then and there, no regrets. What I'm left with is the "greatest hits" that contains only the best of the best, the stuff I could actually see myself using. Of course I still have the ZIP of the full-sized, renamed Instruments, as well as the full-sized, un-renamed Instruments just in case.

4 - Now I can get into QuickLoad. I add everything from the culled and renamed Instruments folder into my QL database. Since it's already just the "greatest hits" this doesn't pollute my QL with tons of chaff. This also means that, for instance, that the QL Aliasies for all my Strings Shorts from all the different libraries will live together in a single folder, while their original Instruments still live in their original locations. Since they've all been renamed to conform to my scheme, they stack up and sort in the QL folders in organized fashion, with "strings-STACCATO-Orchestral Tools" right above "strings-STACCATO-Performance Samples" in the list. This makes navigating and finding which staccato Instrument I want to use a quick process, since I don't have to navigate up three folders, over five, and down three each time. Whenever I back up my Kontakt drives (which I do manually using Synchronize Pro X) I also copy the current state of my QL Database to my backup drives. Since the QL database is small this takes very little drive space.

I do all of this stuff while my enthusiasm and excitement for a new library is still fresh, rather than just sticking it on a drive and probably forgetting I ever bought it. Of course, there's still a LOT of stuff in my QL and the various Instruments folders, but when it's just the renamed + culled stuff, it's a somewhat manageable amount. With that amount, my memory can still function - for instance, I can remember that Orchestral Tools has some good "staccato repeats 16th notes" for instance, since not every library has that type of instrument.

There are still some gray areas, like NI's Thrill, which is a single NKI that can produce a trillion great sounds, so those special-case instruments get a special folder in the QL so I don't have to create / name / deal with a trillion snapshots. I just load it up and manually create what I need on the spot.

I take a similar approach to patches for Omnisphere, Zebra, Diva, etc. I create user library folders and ruthlessly cull any factory or downloaded preset libraries into those. Unlike with Kontakt stuff, I often don't bother to keep a zillion lame "Moog Bass 103" presets hanging around; I just keep the best and trash the rest.

Omnisphere is a bit of a special case, since many purchased libraries contain sample content, so just deleting / renaming the Patches doesn't reduce the size much, and I'd still have gigabytes of sample content that I might not want. But there is a way to reduce the size of Omnisphere libraries after culling. Here's what I do:

1 - Install the library as per instructions, open the Steam folder in list view, and size all your windows so you can see Omnisphere on the left and the Steam folder on the right.

2 - Go into Omnisphere's browser for Multis or Patches, and start auditioning, deleting everything that isn't amazing long the way. To delete a Multi or Preset, I flip over to the Finder and hit the command key to move that item to the trash, occaisionally hitting the Refresh button in Omnisphere to keep the lists in sync.

3 - Rename the culled results. My typical scheme results in names like "ARP - SH - Film Score Pulse", where "ARP" is the category, "SH" is an abbreviation for the library's developer (like SH = Sample Hero), and "Film Score Pulse" is my preferred name of the actual patch. This way, all the ARPs will be in a list, with all the Sample Hero patches next to each other, sorted by name. (I use a similar naming scheme for patches for Zebra, Diva, and other non-Kontakt "synth" instruments).

4 - Optionally, if the library seems to have tons of cool sample content, I might browse that stuff on its own inside an empty INIT patch, but I don't delete the stuff I don't want since some good patches may use that content even if it sounds lame on its own. So I use color-coding in the Finder to highlight the stuff I want to keep with a green tag, and/or creat dummy Presets that use the sample content that I'm not sure whether a good Preset is dependent on - this keeps them included in the process that follows.

So, now, here's how to compile and reduce the results of the culling:

1 - After eliminating the Multis / Presets that I don't want, I use the "Publish Library" function (option-click Omnisphere's Utiliy Menu to show this option) to export the culled results to a new " .omnisphere" file. This file will include only those Mulits and Presets that survived the culling, but most importantly, will include ONLY the sample content that they need in order to play. Any sample content that is not used by those culled Multis / Presets is NOT included in that " .omnisphere" file.

2 - Now I go into the Steam folder and delete the originally installed folders for Multis, Patches, and User Samples from the library in question.

3 - Now, re-import the " .omnisphere" file that I created.

4 - If I'm dealing with a library from, say, Sample Hero, but I already have some existing Sample Hero libraries that have been culled / published / re-imported, I always want them all to be in a single Sample Hero directory and not in a zillion separate library folders for each title. So in order to get that result, I go into the Steam folder and move the culled Multis + Patches (but not the User Samples) from the new Sample Hero folders into the pre-existing Sample Hero folders (effectively merging them), and then Publish THAT folder, which compiles all the Multis, Patches, AND User Samples used by BOTH the previous and new libraries into a single " .omnipshere" file. Then I repeat the process of deleting ALL of the Sample Hero folders from the Steam folder and importing the new " .omnisphere" file. Now I have a single set of folders in the Steam folder that contains ALL of the Multis / Patches / User Samples from ALL of the Sample Hero titles, culled, renamed, and organized - and much smaller than the originals.

It took me a while to figure this process out, but my Steam folder was getting out of hand and something needed to be done. Now, life is good and I can browse either by choosing individual library developers from the drop-down inside Omnisphere's browser, which will show the culled + merged results from all of the Sample Hero titles in one chunk, or just view all libraries at once and browse by category across all developers, and the browser will show all "ARP - SH" (Sample Hero) patches grouped together, and right below them in the list will be all the "ARP - UN" (The Unfinished) patches.

This is the way. I have spoken.
 
Amazing stuff, Charlie! And I know you really get your hands into the smallest details of sampling, resampling, manipulating sounds etc. I am always so impressed when someone can do this and have the PATIENCE to do this! And the thing is, the result might not always reveal all those little details that actually led to the result. Actually I would say, usually you have no clue when you hear it. But when you tell us about your process it all makes sense - and makes it even more impressive.
 
Amazing stuff, Charlie! And I know you really get your hands into the smallest details of sampling, resampling, manipulating sounds etc. I am always so impressed when someone can do this and have the PATIENCE to do this! And the thing is, the result might not always reveal all those little details that actually led to the result. Actually I would say, usually you have no clue when you hear it. But when you tell us about your process it all makes sense - and makes it even more impressive.
Well, since I came up in the all-hardware era, when you'd wait 45 seconds for 1.44mb of samples to load from a floppy disc into your Akai S-900, I learned that patience is required. Now that the tools are so much faster, that same amount of patience lets us produce exponentially greater results. So spending a half-hour to cull and organize a thousand Omnisphere Patches down into 65 good ones that I might actually use seems like a bargain, time-wise.

I do keep track of my speed on these processes, timing myself so that I can estimate whether the next big task will really be worth it. Dealing with Omnisphere / Diva / Zebra patches averages something like one second per incoming patch. I can tell within a second if the sound has potential or goes in the trash. Kontakt stuff obviously takes a little longer due to load times. So 500 Omnisphere Presets can be auditioned and reduced to 40 that I might actually use in around 15 minutes all told. Worth it.
 
That requires a well trained ear, a lot of confidence and a decent amount of ruthlessness. Great practice. Great insight. Many thanks for sharing mister Clouser 🙏
 
That requires a well trained ear, a lot of confidence and a decent amount of ruthlessness. Great practice. Great insight. Many thanks for sharing mister Clouser 🙏
Or at some level it doesn't matter if excellent stuff goes into the reject pile because the key thing is reducing the number of options to a manageable level. The 1 second audition is a useful stage because then you know with confidence that all the patches that remain have passed the "immediately appealing" test. "Immediately appealing" in this sense would mean listening for how the sound will fit with your music, so I think you would have to have a very good sense of your own sound to use this method. And if you do have this sense of your music, then the culling wouldn't really feel that ruthless at all. I agree that this is such good insight from Charlie.
 
Or at some level it doesn't matter if excellent stuff goes into the reject pile because the key thing is reducing the number of options to a manageable level. The 1 second audition is a useful stage because then you know with confidence that all the patches that remain have passed the "immediately appealing" test. "Immediately appealing" in this sense would mean listening for how the sound will fit with your music, so I think you would have to have a very good sense of your own sound to use this method. And if you do have this sense of your music, then the culling wouldn't really feel that ruthless at all. I agree that this is such good insight from Charlie.
Yeah, I've had too many rounds of library reduction, where I've kept stuff that I was on the fence about "just in case", and then 10-20 years (and many backups) later realized, "Why the hell did I keep 200 one-sample MiniMoog bass Instruments? I've never used them because they're in mono, have only one sample spread across the whole keyboard, and I have a real MiniMoog right here?!?!?" After a few dozen rounds of that you start to build confidence about what you can toss.

I also tend to reject certain types of sound on principle - if I hear a glistening hopeful pad that reminds me of the mystical sounds in The Fifth Element, they're gone. If I hear anything that smells like FM synthesis, it's gone. If I hear something that sounds like it could have been made with a Yamaha / Korg workstation keyboard, like a hopeful seventh pad with trickling water behind it, it's WAY gone. Just.... NO.

In the early 2000's, when I had a full-time assistant or two, they were like, "Do you want us to help weed through this stuff for you? Like, prepare a short list that you can shorten even further?" So I showed them my process and would call out the reason why I was rejecting each sound: "Sounds like 1987. Fifth Element. FM cheese. Twinkle pad. Workstation garbage. Sounds like a sine wave. Weak sauce." etc.

And I'd also call out the reasons I was keeping certain sounds: "808 State Cubik hook. Eno would be proud. Synth Ligeti. NIN air conditioner drone. Girthy bottom. Killing Joke OBX. Roxy Music Avalon." etc. As if to say, "this sound could stand proudly in a Killing Joke or Roxy Music track."

We all realized that only I could make those calls, because they would have kept some of the garbage and tossed some of the gold - our backgrounds and influences were different. Similar, but different. It's impossible to out-source curation. So I just do it myself. That's the only way to insure that the sounds match my vision.

When I'm auditioning Omnisphere / Zebra / Diva stuff I just play a C0, a middle C, and a C5 - and often I don't even get to the C5 before going, "No." I play a low note in case there's some magic grinding aspect that C3 wouldn't reveal, but in general it's "Next Preset, C0, C3, C5, delete." Takes a second or so. I do wiggle the mod wheel as I go just in case something interesting happens though.

I also find that even after plowing through 200 patches and deleting them all, I don't get combat fatigue to the point where I'll start tossing stuff I shouldn't. Even in the midst of that much mind-numbing repetition, if a sound has an interesting character, it STILL jumps out of the speakers at me, and that's when I'm glad I took the time to listen to every.... single.... one. Because you just never know when some flakes of gold will be hiding in that pan of dirt.

But this ruthlessness doesn't happen right away. Sometimes it just takes time for your collection to reach critical mass to the point where you can toss stuff with confidence. Once your style is more established, you start to develop the ability to say, "I'd never use this sound, I'd be embarrassed if I did, and if the client really wanted something like that I'd find an alternative that suits my style better."

I admit to keeping some odd-ball stuff like some Big fish $49 loop library like "Smoky Jazz Construction Kits" because they have saved my butt here and there, like when the tv series Las Vegas did an episode set in the 1960's and I needed to score it with a sixties casino jazz comedy feel. I was really glad I had those loop collections (and Ableton Live!), otherwise I never would have made deadline. I used drum loops and wacky trumpet solos from that collection, played my own bass parts using the excellent standup bass in Trillian and organ parts using Logic's stock organ instrument, found some Barney Rubble style bongo loops for comedic effect, and that was a wrap. It was still a week of late nights though...
 
Last edited:
Charlie, a couple of questions semi-related to the bits above if you don't mind.

Do you use a template with some of your tried and true orchestral sections and synths already loaded?
Are your template options universal or only done on a super project specific basis?
i.e. Saw template, Wayward Pines template, etc... I realize that any of these could be realized as episodic and would have some sort of musical framework or vocabulary, but how far does it go?
Are there any elements/ builiding blocks common to all of your templates?
This is something I still struggle with after many years.

Have you done any projects that have taken you way outside your comfort zone that you would like to share with us?

And thanks again for your detailed explanations and generous contributions of time.
 
Last edited:
Charlie, a couple of questions semi-related to the bits above if you don't mind.

Do you use a template with some of your tried and true orchestral sections and synths already loaded
Are your template options universal or only done on a super project specific basis?
i.e. Saw template, Wayward Pines template, etc... I realize that any of these could be realized as episodic and would have some sort of musical framework or vocabulary, but how far does it go?
Are there any elements/ builiding blocks common to all of your templates?
This is something I still struggle with after many years.

I definitely use templates. I create a new one for each project, and this takes anywhere from two days to a week. That process involves not just loading pre-existing instruments but also making some new ones. Usually there is also a few days of recording / editing / mapping new samples into EXS as well as making audio recordings and some loops of anything that isn't mappable and playable from the keyboard, things like drum performances and loops, long drone-scapes which are best dealt with a raw audio files, and plucking / bowing phrases on a ghuzheng or ukulele or whatever else is lying around.

To build a template I sometimes do a "Save As" of a previous one and start modifying it, but as often as not I just start from scratch, either because Logic has introduced some new feature like Folder Stacks, or because I have a new idea or frustrating element that I want to change, like changing the number of instruments or stem layout, etc. Plus I am so quick and have some shortcuts that make this process less painful that it seems.

I build my templates manually in Logic's Environment, and I do not use Logic's Mixer that appears at the bottom of the Main Window at al. This lets me precisely lay out the position of each Object in a visually pleasing manner that is familiar and easy to navigate. In order for this approach to work, you must turn OFF "Automatic Management of Channel Strip Objects" in Project Settings so that Logic will never add or delete and audio object as new tracks are created or deleted. I am still using a 2013 Mac Pro cylinder with Logic v10.4.8 under MacOS Mojave, so that means I'm still on EXS24 (not the new Sampler) and there are some other newer features I don't have yet. I will switch to the current MacOS and Logic versions at the next computer upgrade, whether 2019 Mac Pro or Apple Silicon Mac Pro.

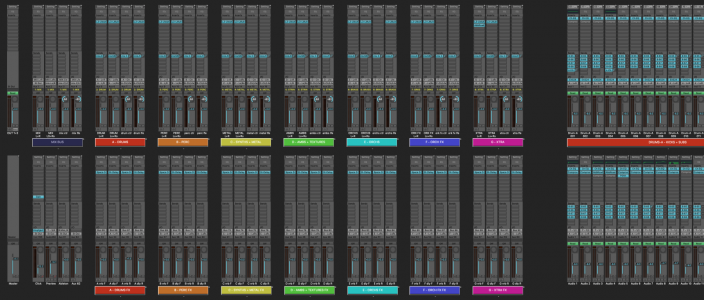
I use three rows in a single Environment Layer, with all "master" elements like stem sub masters, per-stem reverbs + delays, etc. at the left side. Here is a screenshot of the left side and the first few elements of the right side:

CCtemplateMixer2020.png

Top row, from left to right:

- A single Output Object for stereo out 1+2 = this gives me a quick way to make a stereo bounce.

- The next four, labelled Mix Bus, are Aux Objects that are the composite mix sub-masters. Their sources are Busses 1-4 and their destinations are hardware outputs 1-6, which go to my speakers. The reason these, and all the other stem sub-masters, are in groups of four is a workaround for Logic's inability to do surround stems. My kludge for this is to use a stereo Object for the front L+R, another stereo Object for the rear L+R, and a mono Object for each of the Center and LFE channels. Since Logic only has a single "Surround" set of outputs, it is not possible to use any of its Surround mixing features when one wants to output more than a single set of Surround channels, as you would when outputting multiple stems, so I must fake it using multiple stereo+mono Objects just like when mixing in surround on a non-surround-capable analog console like the SSL 4k, which I had already done so I was familiar with this method of kludging. The reason that there are only four Busses but six Outputs is because a single Bus in Logic can be stereo while a single Output is by definition mono. In order to make things clearer and line up in a 1-to-1 manner I used to skip over Busses, so Front L+R would be Bus 1, skip Bus 2, Rear L+R would be Bus 3, skip Bus 4, Center would be Bus 5, and LFE would be Bus 6. This lets the numbering of Busses match exactly the numbering of mono hardware Outputs as well as hardware input numbering on my separate ProTools stem recorder. I changed to the pictured condensed Bus allocation because for a while Logic had only 64 Busses and I was running out. Now that there are 256 or 1000 or whatever it is, I can go back to skipping over the right-channel Busses so that the numbers are all symmetrical, but I haven't yet.

- The next seven bricks of four Aux Objects each are the per-stem sub-masters. The sources for these are Busses 5-32 and the outputs are hardware outputs 7-48. (As described above, the asymmetry between Bus numbers and hardware output numbers is because I'm not doing "right channel skipping" to keep them the same.) All Instruments, Audio Tracks, and Effect Returns are routed to the Busses that feed these stem sub-masters with no exceptions except for Click, Preview, and ReWire returns which I will explain later. These stem sub-masters are combined into the composite mix via the sends at the top of each channel, whose destinations are the Busses that feed the composite mix sub-masters described above. So in each brick of four stem sub-masters, the first ones all go to the Bus that feeds the first composite mix sub-master, the second ones all go to the Bus that feeds the second composite mix sub-master, etc. In other words, all of those stem sub-masters combine at unity gain into the composite mix.


- Going off to the right are the individual Software Instrument Objects that hold all of the EXS, Kontakt, Omnisphere, whatever. At the moment there are 768 in my template. Instead of a single, giant row, for visual clarity I break them up into bricks of 16, with each brick in a Folder Stack, and a nice label beneath. The labels are NOT Logic's "Ornament" Objects, which don't work as expected - they are Fader Objects. I will explain how to make them in a separate post.

I group everything into 16-channel bricks because my brain still thinks in bricks of 16 MIDI channels, and this is a convenient size for me. Each brick will have sixteen EXS instances, so for "Kicks + Subs" that means 16 maps of 88 one-shot samples each - plenty of samples to choose from! When we get up to strings and stuff, I might have 16 strings longs, 16 strings shorts, 16 strings fx, 16 brass low, 16 brass shorts, etc.

In the second row of the top picture, from left to right:

- A single Master Fader Object. Adjusting this fader trims the levels of ALL hardware outputs at the same time. I only use this in emergencies when I need to lower the outputs by a db or two because something's clipping. Normally this is at zero.

- The next four are Click (Klopfgeist), Preview (for previewing WAV files in browsers, etc.), and ReWire returns from Ableton Live and Reason. All of these four are routed NOT to any of the stem sub-master busses, but directly to Outputs 1+2 because I don't want any of them to go through any of the per-stem processing. My ReWire returns go directly to the stereo out so that I can bounce those returns without going through any per-stem processing. That is how I bring in elements from ReWire - I use Region Solo to "solo nothing" so that nothing from Logic makes any sound, and then do a bounce of outputs 1+2 which results in a clean bounce of the ReWire elements, which I then manually drag into an Audio Track in Logic.

- Now we come to the per-stem effects returns. Each brick of four has two Space Designers and two Stereo Delays, one of each for the front and back stereo pairs. These are Aux Objects whose sources are Busses 65-92 and whose destinations are the Busses 5-30 that feed the stem sub-masters above in the same manner that Instrument and Audio tracks do. (There are no effects returns for Center or LFE channels.) Sends from individual Instruments and Audio Tracks feed those elements into the correct reverbs and delays for their stem.

- Going off to the right are the individual Audio Tracks. I route these to individual stem sub-masters just as I do the Instrument Objects. At the moment I have 256 in my template.

There are other miscellaneous Objects that clutter things up, like the VCA Faders that are automatically created for each Folder Stack and VEPro "Multitimbral Instrument". I stash these on a separate Environment Layer because I never touch them and don't want to look at them. I will discuss my VEPro implementation in another post.

The resulting Environment Window is absolutely gigantic - manually scrolling can be a pain so sometimes I use the purple "chain link" icon so that the Environment will auto-scroll to show the Object for the currently selected track in the Main Window. I leave the Environment Window full-screen on a second monitor, but usually I leave it scrolled to show only the sub-master stuff at the left side, and leave chain-link turned off since the fader in the lower left of the Main Window shows me the currently selected track.

Have you done any projects that have taken you way outside your comfort zone that you would like to share with us?

And thanks again for your detailed explanations and generous contributions of time.
There are a few films I've done that are don't have my typical layout. One was called "The Neighbor" and I'm not sure if it ever came out or not. All of the sounds were made from guitars and hardware synths so it was almost all audio. Another, called "Eye Without A Face" will come out this fall and was also almost all audio and very few software instruments. So these didn't need 768 instances of EXS.
 
Here is how I make those colored labels beneath each brick of faders in Logic's Environment. They are NOT the "Ornament" Objects, which can't be resized and made opaque; rather they are Fader Objects with very particular settings.

- In the Environment, go New > Fader > Text. This creates a Fader Object whose type is "Text", normally used as a pop-up menu to select patches from a list of 128 for a hardware synth or whatever.

- In the parameters box at the upper left of the Environment, with the new Object selected, set the Range to "0 : 0" so that the Fader has only one possible value. It is this value, which will be displayed "As Text", and NOT the name of the Object, which will contain the text that you want the label to display.

- To enter the text you want the label to display, double click the Object which will bring up a window into which you can enter text for each of the 128 possible values of the fader. Normally this would be where you enter the names of the 128 patches you want the pop-up to display. Since we have restricted the value range to a single value ( 0 : 0 ), clicking the pop-up will do nothing since there is only a single possible value, and thus only the first item in the list is of use to us. Double click the first value and enter the desired text you want the label to display.

- It is important to give the Object a name, which will be displayed underneath the label and not in the colored portion. I just use " - " as a name so things don't get cluttered. But don't make the name field totally empty or you won't be able to move the Object to where you want it in the Environment.

- You can resize the resulting Object by dragging its lower right corner.

- You can move the resulting Object to where you want it by grabbing it by the name, displayed underneath the Object itself, and using that as a drag handle. This is why you shouldn't leave the Name field totally empty - if you use " - - - - " as a name then you'll have a bigger handle to grab and drag, but for me a single "-" is big enough.

- You can color the resulting Object by selecting it, bringing up the Colors palette, and clicking the desired color.

- In order to move and resize these Objects, you must have View > Protect Cabling/Positions turned OFF. Once things are set up the way you want them, you can turn this on to prevent accidentally wrecking stuff.

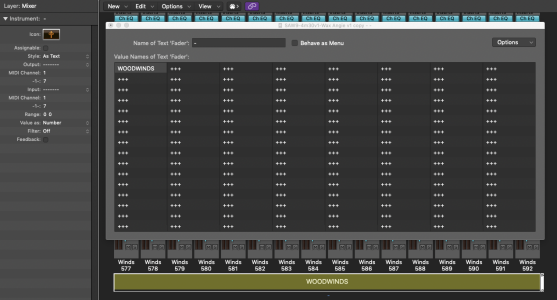
Note that these Objects are technically capable of sending MIDI to a destination, so it's important to set their output port to a null destination so that Program Change messages don't go flying around as you fiddle with stuff. These settings are shown in the pic below.

CCtemplateLabels2020.png

This pic shows the parameters for the Object that creates the label that displays WOODWINDS. The really important ones are "Style = As Text" and "Range = 0:0". The rest relate to what MIDI data type and port will be sent when this control is operated. Since it is not possible to select a null value for MIDI Channel and Data Type, you can leave these set to whatever as long as you make sure the Input and Output are set to a null device. I create a dummy MIDI Instrument on a spare Environment Layer which has a null destination (in this example it's named " -------- "), and I use that as a dead-end destination for these Label Objects.

On the right of the pic is shown the value list editor, this is what you see when you double-click the Object. Since our Value Range is set to 0:0, only that first field is of any use. THAT is where you enter the text you want the Object to display. In this case it is "WOODWINDS". Enter that text and close the value list editor, and the Object will now show your desired label. Color it, resize it, and position it is needed. There is no practical limit to how many or how large these can be, so go wild.
 
Last edited:
The way I deal with VEPro in Logic is still archaic, since AUv3 with multi-port MIDI per instance is still not up and running yet (I don't think?). So I am still forced to deal with VEPro instances as if each one had only a single 16-channel MIDI input. Of course, since VEPro v6 or so, you can have multiple instances as tabs within a single window, so you don't have a hailstorm of overlapping windows. Plus, since my brain is hardwired to think in terms of 16-channel bricks this is okay by me.

This means that in my world, each VEPro instance (or tab) has 16 incoming MIDI channels and returns its audio to Logic as a single stereo pair. If I want individual plugins on each of the 16 slots in a VEPro instance, they must be inserted in VEPro and not in Logic, since any plugins inserted on any of the return objects in Logic will affect ALL of the summed audio from that instance. Also, any adjustments to the volume, pan, effect sends, and routing from any of those return objects will affect ALL of the summed audio from that instance.

So you can think fo each 16-channel VEPro instance as the equivalent of a Summing Stack - all of those channels flow through the same audio path in Logic.

Here is how I do it:

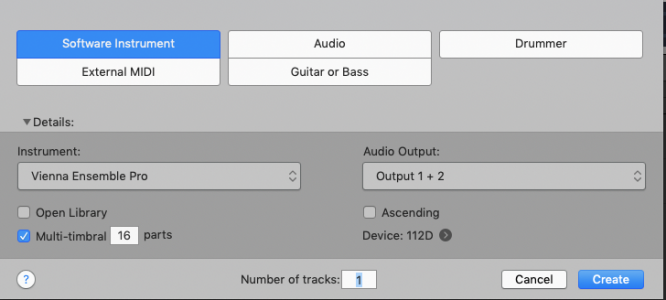
- In the Main Window, click the "+" button at the upper left to create a new Track.

- In the resulting dialog, select Software Instrument as the type, VEPro as the desired Instrument, and make sure to click the checkbox for "Multi-timbral" as shown below.

CCtemplateNewVEPro2020.png

The result will be a row of 16 Tracks in the Main Window (and 16 Objects in the Environment), each representing a single MIDI channel of that instance. Again, adjusting volume / pan / routing / plugins on any one of those will affect ALL of them, so it's a little confusing and cluttered. You can't really see the individual channels that feed this "Summing Stack" unless you go over to VEPro itself and make your adjustments there.

So that's actually kind of convenient. I use each 16-channel instance to group Strings Shorts or Solo Strings or whatever, because I sort of like having them pre-summed outside of Logic. Since I run VEPro locally on the same machine as Logic, all of my plugins (except, of course, Logic's built-in plugins) are already available over in VEPro, so it's a simple matter to put an eq or reverb on just one of the 16 channels.

My template uses sixteen VEPro instances, which gives me 256 slots into which I can insert Kontakt or whatever, and which return as 16 stereo pairs into Logic - but this takes up 256 individual faders in Logic's Environment even though it's really only 16 individually adjustable objects. So I stash these on the bottom row of my gigantic Environment Window because I rarely need to mess with them very much.

It is not perfect but when I need to fiddle with big bricks of orchestral instruments I sometimes use it.
 
Some more things I do to make dealing with large templates in Logic easier:

- After I've built a template, I save it once with "Copy EXS Instruments and Samples into project" turned ON. This gives me an archive in the master folder for the film with all of the EXS stuff that is used in the template, so I later I don't have to go fishing for which staccato strings I wound up choosing.

- After a film is finished and delivered, I save each cue with "Copy EXS Instruments and Samples into project" turned ON, and then I merge all the samples into a single master folder to save space, but I leave the Instruments for each cue in that cue's folder since they are small. This gives me an archive of everything that might have been added to the template as work progressed, like one-off Instruments that were loaded up for just one cue or whatever.

- I also merge all of those archived Instruments folders into a single master folder and put that inside my EXS Library in a folder named "zz Project-Specific Instruments". This means that at the bottom of my normal list of Instruments in Logic's Browser is a set of folders showing JUST what was used in each film. Since it's just the EXS Instruments which refer to their dependent samples stored in their normal locations, these don't take up much disc space at all, and it's very handy.

- When I have a template I really really love, I sometimes do these two things:

A - I save each EXS Instrument to a new folder with new names that include the slot number they occupied in my template. So if Instrument 12 had the EXS Instrument "Sub Booms 22" in it, I'll save it out as "012 - Kicks+Subs - Booms 22". This gives me a new, uniquely-named copy of something pulled from my library, and I can edit this without affecting the original. But more importantly, I can also save a Channel Strip Preset that refers to this EXS Instrument file and not to the original.

B - I now save out every channel strip as a Channel Strip Setting file, with identical names to the newly-created EXS Instruments describe above. This, of course, includes any plugins that were on the channel strip as well.

Now I have a nice, numbered set of Channel Strip Settings whose names are identical to the EXS Instruments they depend on. I don't do this for every project, just when I've built a new "super template" that I want to be able to refer to bit by bit in future situations.

Of course, if you're using Kontakt, Omnisphere, etc. this whole operation gets messy and falls apart a little bit. But you can still save out the Channel Strip Settings and just skip the saving of renamed EXS Instruments and you'll get most of the benefits. I have key commands assigned to copy / paste / next / previous Channel Strip Settings, so I can navigate tracks with arrow keys and build a new template by loading the first Channel Strip Setting from the archive I created above (like "01 - Kicks+Subs - Kicks 01"), then copying that, arrow-down to the next track, paste that, hit "next Channel Strip Setting", and now I've got "02 - Kicks+Subs - Kicks 02" on track 2. And so it goes, bringing in and rearranging the elements from a previous good template into a newly-created-from-scratch template, using only key commands and no menu diving or mousing around. Really quick.
 
Charlie, thanks for the master class. I'm going to be spending a little/lot of time working my way through your writings on workflow and seeing what works in my world. I think it's going to take me a couple days just to fully digest your posts and then figure out the best way to implement them on my system.

I'm a mac/logic guy as well and much of what you shared will be of great help to me as well.
I depend quite a bit on Kontakt and u-He synths so I'll have to do some of the adaptations that you suggested to tidy things up a bit.

You are obviously a thoughtful guy and the way you have created a process to create music in as efficient a manner as possible is impressive.
The fact you choose to share that process with others is generous beyond the norm.

Thanks, Steve
 
Top Bottom